
An Inspection Checklist for Cup Dispenser Cabinets
Inspect cup dispenser cabinets: dispenser fit and replenishment, the four checks to record and the inspection checklist to prepare before ordering.
- Published
- 2026-09-15
- Content updated
- 2026-10-22
- Reading time
- 4 minutes

Editorial buyer guidance. Read our authorship and sourcing policy.
For cup dispenser cabinets, begin with dispenser fit and replenishment. Check the range of cup rim sizes accepted by the selected dispenser using actual sample cups. Prepare an inspection checklist covering cup rim diameter, dispenser length, cutout size, refill clearance. Describe the actual difference, its location and the relevant requirement. Photograph it with the item reference and suitable scale, then record the agreed corrective action and recheck. Visual inspection is separate from a certified performance test.
Three decisions for your fixture purchase.
- 01
Confirm dispenser fit and replenishment
- 02
Check cup rim diameter alongside dispenser length
- 03
Prepare the inspection checklist
Inspect against the released configuration: cup dispenser cabinets
Use the approved drawing, finish sample and purchase scope as the inspection basis. Identify the item and revision before checking dimensions, visible finish, hardware operation, assembly and any ordered accessories. Cup volume alone cannot confirm dispenser fit. Check the rim diameter, stack behavior and the selected dispenser model. On the cabinet drawing, show the installation angle and the space behind the panel so the dispenser can be loaded and removed without interference.
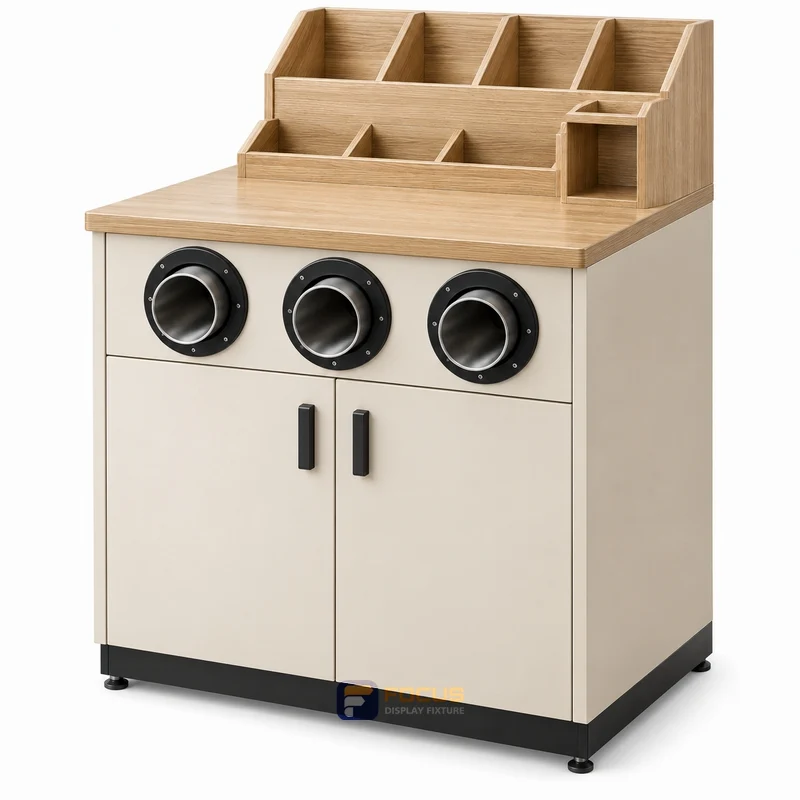
Four checks for the inspection checklist
Use these checks for cups and lids. Record the value or decision, its evidence and any unresolved point beside the fixture reference.
- cup rim diameter · Check the range of cup rim sizes accepted by the selected dispenser using actual sample cups.
- dispenser length · Allow for the dispenser body behind the face, plus the space needed for removal.
- cutout size · Use the dispenser template for the opening and fixing pattern instead of the cup diameter.
- refill clearance · Trace the full sleeve refill movement with adjacent equipment and cupboard doors in position.

Compare the cup dispenser cabinets options
The starting arrangements are Front dispenser cabinet, Worktop dispenser module, Cup and lid tower. Compare them for cups and lids using the same inspection checklist. Cup volume alone cannot confirm dispenser fit. Check the rim diameter, stack behavior and the selected dispenser model. On the cabinet drawing, show the installation angle and the space behind the panel so the dispenser can be loaded and removed without interference.

Worked planning example
Use a project-specific inspection checklist for cup dispenser cabinets. Check the range of cup rim sizes accepted by the selected dispenser using actual sample cups. Use the dispenser template for the opening and fixing pattern instead of the cup diameter. No verified overall configuration is listed for this application in the current size catalog; obtain a dimensioned drawing rather than borrowing the dimensions of a shelving unit.
Record a useful discrepancy
Describe the actual difference, its location and the relevant requirement. Photograph it with the item reference and suitable scale, then record the agreed corrective action and recheck. Visual inspection is separate from a certified performance test. Trace the full sleeve refill movement with adjacent equipment and cupboard doors in position.
Prevent this cup dispenser cabinets mistake
Equating cup volume with dispenser opening size. Check the range of cup rim sizes accepted by the selected dispenser using actual sample cups. Use the dispenser template for the opening and fixing pattern instead of the cup diameter.
What to send with the inspection checklist
Send the selected fixture reference, the marked drawing and the intended use for cups and lids. Include cup rim diameter and dispenser length, then document cutout size and refill clearance. State the quantity, destination and any components supplied by others. List alternatives separately so a change of configuration does not silently change the comparison.
Translate the guidance into a specification check.
Use these parameters to record the actual merchandise, clear dimensions and configuration required for the cabinet quotation.
Source: current fixture dimension catalog. Catalog dimensions apply to the named series and arrangement; confirm the selected configuration against the project drawing.

Store 16 · Warm cafe convenience store
- Market
- Design reference
- Store format
- Store layout reference
- Project scale
- Project-specific
Challenge
Coordinate cups and lids with dispenser fit and replenishment.
Planning response
Bring cup rim diameter, dispenser length, cutout size, refill clearance onto the fixture review record.
Reference interpretation
The image illustrates an arrangement; installed quantities and site dimensions follow the project brief.
Explore More Store ArrangementsCompare one controlled basis.
Turn the review into an order record.
Describe the actual difference, its location and the relevant requirement. Photograph it with the item reference and suitable scale, then record the agreed corrective action and recheck. Visual inspection is separate from a certified performance test. Trace the full sleeve refill movement with adjacent equipment and cupboard doors in position. Keep the decision with the selected fixture reference, quantities and drawing revision.
Review FOCUS capabilities →What still needs configuration confirmation.
AI-assisted purchasing guidance with illustrative calculations; project engineering remains configuration-specific.
Prepare the required inputs →Avoid these shortcuts.
- Treating a reference image as an approved production specification.
- Comparing suppliers without identical dimensions, quantities and delivery scope.
- Separating material, lighting or hardware decisions from the drawing revision.
- Leaving packing, local installation and site interfaces undefined.
Before the next approval.
Download this guide and checklist ↓- Cup rim diameter: Check the range of cup rim sizes accepted by the selected dispenser using actual sample cups.
- Dispenser length: Allow for the dispenser body behind the face, plus the space needed for removal.
- Cutout size: Use the dispenser template for the opening and fixing pattern instead of the cup diameter.
- Refill clearance: Trace the full sleeve refill movement with adjacent equipment and cupboard doors in position.
- Attach the inspection checklist and the selected drawing revision
- Mark unresolved points and assign a responsible project contact
- Record each open point, owner, due date and required evidence.
Answers to the next practical questions.
01What information is needed for this cup dispenser cabinets inspection check?+
Provide cup rim diameter, dispenser length, cutout size, refill clearance, the fixture reference and its drawing revision. Check the range of cup rim sizes accepted by the selected dispenser using actual sample cups.
02Why should I check dispenser fit and replenishment?+
Equating cup volume with dispenser opening size. Allow for the dispenser body behind the face, plus the space needed for removal.
03Does this inspection checklist confirm a price or product rating?+
No. It identifies the inputs needed for a configuration review. Dimensions, documented performance, included items, quantities and delivery terms must be confirmed for the selected assembly.
Trace the supporting information.
Current dimension catalog ↗Updated fixture dimensions, series and configuration scope.
Content review policyGuidance published 2026-09-15. Content updated: 2026-10-22. Project engineering approval and physical testing are separate.
Move from research to a fixture specification.
Keep building the specification.

Packing and Delivery Planning for Cup Dispenser Cabinets
For cup dispenser cabinets, begin with dispenser fit and replenishment. Check the range of cup rim sizes accepted by the selected dispenser using actual sample cups. Prepare a packing and receiving schedule covering cup rim diameter, dispenser length, cutout size, refill clearance. Link the package ID to the fixture, store zone, loose hardware and installation information. Record who unloads, checks, assembles and makes site connections, including how receipt damage is documented.
Read next →
Planning Maintenance and Replacement Parts for Cup Dispenser Cabinets
For cup dispenser cabinets, begin with dispenser fit and replenishment. Check the range of cup rim sizes accepted by the selected dispenser using actual sample cups. Prepare a maintenance and spare-parts record covering cup rim diameter, dispenser length, cutout size, refill clearance. Use the selected surface and component suppliers’ instructions for cleaners and maintenance. Test compatibility as appropriate before routine use; appearance alone does not establish chemical resistance.
Read next →
Standardizing Cup Dispenser Cabinets Across Multiple Stores
For cup dispenser cabinets, begin with dispenser fit and replenishment. Check the range of cup rim sizes accepted by the selected dispenser using actual sample cups. Prepare a store allocation and revision register covering cup rim diameter, dispenser length, cutout size, refill clearance. Link each purchase and package to the released fixture revision. When a connection, finish or equipment interface changes, confirm compatibility and identify which stores and spare parts are affected.
Read next →Request a configuration for your next fixture order.
Send available dimensions, merchandise package sizes, cabinet quantities, destination and required options. FOCUS can review a specific configuration and quotation scope.
Request a Fixture Quote